
Starting a podcast feels complicated because there are a lot of decisions to make at once — what microphone, what software, how to set everything up, how to make it actually sound good. Most guides make this worse by presenting overwhelming gear lists or burying the practical advice in technical jargon.
This guide gives you one clear, complete setup at three budget tiers: a starting point if you want to spend as little as possible, a mid-range setup that produces broadcast-quality audio, and a step-up setup for podcasters who’ve committed to the medium and want gear that won’t need replacing. It also covers the room setup decisions that matter more than any single piece of gear: where to put the mic, how to treat your recording space without buying acoustic panels, and what to actually do on the day you hit record for the first time. Everything here has been selected for real home environments — not studios.
Which Setup Is Right for You?
Just getting started: Budget Setup (~$80) — Samson Q2U via USB, free software, no interface needed. Start recording today.
Committed to publishing consistently: Mid-Range Setup (~$300) — Rode PodMic + Scarlett Solo + MDR-7506. Broadcast-quality audio you’ll never need to upgrade.
Long-term serious podcaster: Step-Up Setup (~$600) — Shure SM7B + Scarlett 2i2 + MDR-7506. Build it once, don’t replace it.
Quick Picks
Best budget setup (~$80): Samson Q2U + Audacity — USB direct, no interface, start recording today
Best mid-range setup (~$300): Rode PodMic + Scarlett Solo + MDR-7506 — complete XLR signal chain, broadcast-quality audio
Best step-up setup (~$600): Shure SM7B + Scarlett 2i2 + MDR-7506 + Rode PSA1 — build once, never replace
Full Breakdown
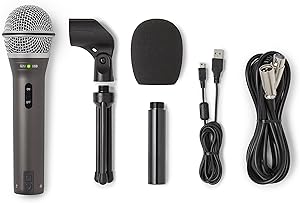
Budget Setup — Samson Q2U + Audacity
The fastest path from zero to published podcast — under $100 all-in, no interface required, dynamic capsule handles untreated rooms better than condenser alternatives, and produces audio clean enough to publish professionally from day one
Kit Components
- Samson Q2U — dynamic USB/XLR mic, built-in headphone jack, desk stand included (~$70)
- Neewer Boom Arm — positions mic at face height, the single biggest quality upgrade over the desk stand (~$18)
- Audacity (Windows/Linux) or GarageBand (Mac) — free recording and editing software
Pros
- Under $100 all-in — start recording today without overcommitting
- No interface required — plug into any computer via USB
- Dynamic capsule handles home offices and untreated rooms better than condenser alternatives
- Completely functional professional podcast workflow at the lowest possible cost
Cons
- Audio quality noticeably below mid-range and step-up setups
- USB limits the quality ceiling compared to an XLR signal chain
- Plastic construction feels its price
Bottom line: The Q2U is the right first microphone for podcasters who want to start immediately without overcommitting. Buy this setup to launch your first episodes, validate that you’ll keep podcasting, then upgrade when the content — not the gear — is the limiting factor.
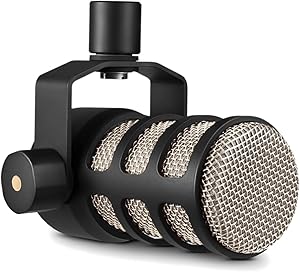
Mid-Range Setup — Rode PodMic + Scarlett Solo
The complete professional signal chain that most serious podcasters converge on — broadcast-designed mic voicing, clean XLR preamp, accurate monitoring headphones, and a complete workflow that most podcasters never need to upgrade beyond
Kit Components
- Rode PodMic — internal pop filter, tight cardioid pattern, warm broadcast voicing, XLR only (~$100)
- Focusrite Scarlett Solo Gen 4 — clean preamp, USB-C, phantom power, single XLR input (~$120)
- Sony MDR-7506 — closed-back monitoring, broadcast standard, accurate frequency response (~$90)
- Neewer Boom Arm — holds mic at correct face height for consistent recording (~$18)
- XLR Cable — mic to interface connection (~$10)
Pros
- Broadcast-quality audio from the first recording session
- XLR signal chain provides better gain control and audio headroom than USB
- Complete setup: mic, interface, and monitoring all covered
- Every component has a long track record in professional podcast production
Cons
- More components to connect and manage than a USB-only setup
- $300 is a real investment — not appropriate if you haven’t committed to publishing
Bottom line: This is the setup most serious podcasters converge on eventually. The PodMic and Scarlett Solo together produce results that justify the jump from the budget setup, and the MDR-7506 lets you monitor accurately from the first session. Build this when you’ve published a few episodes and decided you’re committed.

Step-Up Setup — Shure SM7B + Scarlett 2i2
The setup you build once and don’t replace — the SM7B is the benchmark podcast microphone, forgiving in bad rooms, warm in its voicing, and built for decades of professional use. The Scarlett 2i2 provides two inputs for in-person interviews and Gen 4 preamps that handle the SM7B without a Cloudlifter in most cases
Kit Components
- Shure SM7B — the benchmark podcast microphone, forgiving in untreated rooms, warm voicing (~$399)
- Focusrite Scarlett 2i2 Gen 4 — two XLR inputs, USB-C, Gen 4 preamps with enough gain for the SM7B (~$160)
- Sony MDR-7506 — closed-back monitoring, broadcast standard, accurate frequency response (~$90)
- Rode PSA1 Boom Arm — professional studio arm, supports SM7B weight, smooth repositioning (~$99)
- XLR Cable — mic to interface connection (~$10)
Pros
- SM7B performs better in untreated rooms than any other mic in this guide
- 2i2’s two inputs support in-person two-person recording
- Every component is professional broadcast standard
- Nothing in this setup needs upgrading for years
Cons
- $600+ requires serious commitment to the medium to justify
- SM7B needs a quality boom arm — the included desk stand is not adequate
- Overkill for casual or early-stage podcasters
Bottom line: Build this setup when you’ve been publishing consistently, know podcasting is a long-term part of your work, and want to solve the gear question permanently. The SM7B alone justifies the cost for anyone who records regularly in an imperfect space.
| Component | Budget (~$80) | Mid-Range (~$300) | Step-Up (~$600) |
|---|---|---|---|
| Microphone | Samson Q2U (~$70) | Rode PodMic (~$100) | Shure SM7B (~$399) |
| Interface | None (USB direct) | Scarlett Solo Gen 4 (~$120) | Scarlett 2i2 Gen 4 (~$160) |
| Headphones | Optional | Sony MDR-7506 (~$90) | Sony MDR-7506 (~$90) |
| Boom Arm | Neewer arm (~$18) | Budget arm (~$18-30) | Rode PSA1 (~$99) |
| Software | Audacity / GarageBand (free) | Audacity / GarageBand (free) | Audacity / Reaper |
| Connection | USB to computer | XLR to interface | XLR to interface |
Room Setup: What Matters More Than Your Gear
The single most impactful thing you can do for your podcast audio quality doesn’t cost money: record in the right position in your room. Hard walls and bare floors create echo; soft furnishings absorb it. The best rooms for home recording are naturally furnished — bookshelves full of books, sofas, carpets, curtains, and clothes in wardrobes all absorb sound before it bounces back to your microphone.
Before spending money on acoustic treatment, try recording in different positions in your space. A corner of a furnished room often sounds better than the center of a room with bare walls. A small closet full of clothes is frequently the best-sounding recording space in a home.
Mic Technique: The Overlooked Variable
How you use your microphone matters as much as which microphone you chose. For dynamic mics (the SM7B, PodMic, and Samson Q2U), stay 6-12 inches from the capsule, speak directly into the front of the mic (not the top), and keep your positioning consistent across a recording session. Moving away from the mic even a few inches changes the level and allows more room noise into the recording. A boom arm that holds the mic at a fixed position helps maintain consistency across every episode.
Software Setup: What to Install Before Your First Recording
For the mid-range and step-up setups, your recording workflow is: interface connected to computer via USB-C, mic plugged into interface channel 1, headphones plugged into the interface headphone output, and your DAW (Audacity, GarageBand, or Reaper) set to use the interface as both its audio input and output. In your DAW, create a mono audio track, set the input source to your interface channel 1, arm the track for recording, and do a test recording to check levels before your actual session.
Frequently Asked Questions
How do I make my recording space sound better without buying acoustic panels?
Record in a furnished room rather than a bare one, position yourself in a corner where walls meet (this breaks up parallel reflections), hang curtains or tapestries on walls behind your recording position, and place a thick blanket over a chair back to create a temporary reflection-absorbing surface behind the microphone. These low-cost solutions address the most common home recording acoustic problems without requiring panel installation.
How long does it take to set up a home podcast studio?
A budget setup (Q2U + software) takes under 30 minutes: unbox the mic, connect it via USB, install Audacity or open GarageBand, and do a test recording. A mid-range XLR setup (PodMic + Scarlett Solo) takes 30-60 minutes for initial setup and calibration — the extra time is spent setting interface gain, confirming input routing in your DAW, and checking monitoring levels. The step-up setup is the same process, just with the SM7B in place of the PodMic.
Do I need to soundproof my recording space?
Soundproofing (preventing sound from entering or leaving a room) is different from acoustic treatment (managing how sound behaves inside a room). True soundproofing requires structural work. Acoustic treatment — adding soft surfaces to reduce echo and reflections — is what actually improves podcast audio, and it can be achieved with soft furnishings, blankets, and bookshelves without any construction. Most home podcasters need acoustic treatment, not soundproofing.
Related Guides
- Best Complete Podcast Setup Under $200: The Gear Ladder’s Missing Rung
- Best Complete Podcast Setup Under $300: Everything You Need to Start Recording Today
- Best Boom Arm for Podcasting: The Ones That Don’t Wobble
- Audacity vs GarageBand vs Reaper: Best Free Podcast Editing Software
Browse all guides in our Complete Setups Hub.