
Starting a podcast involves a lot of decisions made at once — microphone, interface, headphones, cables, stand — and the combination of choices can stall even motivated people who just want to hit record. A good starter kit solves that by bundling what you need into a single purchase decision. The challenge is that most gear bundles on the market are built around margins, not outcomes: cheap mics paired with unnecessary accessories that don’t actually improve your recordings.
This guide takes a different approach. Rather than reviewing pre-packaged retailer bundles, it defines three component-based setups at different price points — budget, mid-range, and step-up — and explains exactly what to buy, why each component earns its place, and what you’re getting for the money at each tier. All three setups are complete: you can buy everything on the list and record a professional-sounding episode the same day.
Quick Verdict
Best budget kit (~$80): Samson Q2U + boom arm. Dynamic capsule, USB or XLR output, built-in headphone monitoring. Everything you need to start, nothing you don’t.
Best step-up kit (~$500): SM7B + Focusrite Scarlett 2i2 + boom arm + Sony MDR-7506 headphones. The setup that serious podcasters build once and don’t replace. Only buy this if you’ve committed to publishing consistently.
Quick Picks: Best Podcast Starter Kits
Best budget (~$80): Samson Q2U + basic boom arm — dynamic capsule, USB or XLR, built-in headphone monitoring, no interface required
Best mid-range (~$250): Rode PodMic + Focusrite Scarlett Solo + boom arm — broadcast-quality XLR setup at a fraction of professional studio cost
Best step-up (~$500): Shure SM7B + Focusrite Scarlett 2i2 + boom arm + Sony MDR-7506 headphones — the setup serious podcasters build once and don’t replace
Full Breakdown
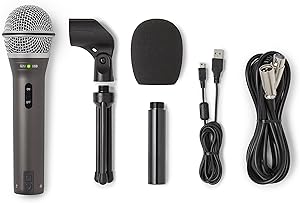
Budget Kit — Samson Q2U Setup
~$80 total — Samson Q2U (~$70) + basic boom arm (~$15). Dynamic capsule, USB or XLR output, built-in headphone jack, and a complete kit that requires no additional purchases to start recording.
Kit Components
- Samson Q2U (~$70) — USB/XLR dynamic mic with built-in headphone monitoring
- Basic boom arm such as the Neewer NB-35 (~$15) — positions mic at face height
- XLR cable — included with the Q2U
Pros
- Under $100 all-in — lowest barrier to entry of any complete setup
- Dynamic capsule handles untreated rooms better than budget condenser alternatives
- USB output means no interface required
- Built-in headphone monitoring jack for real-time recording feedback
- Comes with stand, clip, and cables — genuinely ready out of the box
Cons
- Sound quality is noticeably below the mid-range setup — voices lack warmth and presence
- USB audio maxes out at 16-bit/44.1kHz — fine for podcasting, limited otherwise
- Budget build quality — plastic construction feels its price
Bottom line: The right setup for first-time podcasters and anyone who needs to start recording today without a significant upfront investment. The Q2U sounds like a budget dynamic, but for a first setup while you’re establishing a workflow and figuring out if podcasting is for you, it’s the right call.
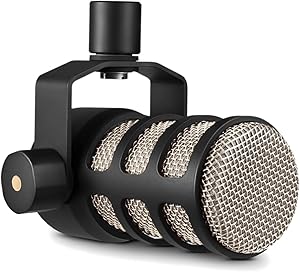
Mid-Range Kit — Rode PodMic + Scarlett Solo
~$250 total — Rode PodMic (~$100) + Focusrite Scarlett Solo (~$120) + XLR cable (~$15) + boom arm (~$30). Broadcast-quality voice performance in a complete XLR setup at a fraction of professional studio cost.
Kit Components
- Rode PodMic (~$100) — XLR dynamic with internal pop filter and broadcast voicing
- Focusrite Scarlett Solo Gen 4 (~$120) — clean preamp, 48V phantom, USB-C interface
- XLR cable (~$15) — standard balanced cable, any brand works
- Boom arm (~$30–$100) — Rode PSA1 or Heil PL-2T recommended
Pros
- Broadcast-quality voice performance at a mid-range price
- XLR signal chain provides better gain control than any USB mic
- Rode PodMic’s internal pop filter handles close-mic technique without plosives
- Tight polar pattern handles untreated home offices well
- Scalable — the Scarlett Solo can be upgraded to a 2i2 later without replacing anything else
Cons
- More components to manage than a USB setup
- Total cost is 3x the budget kit — a meaningful investment for someone just starting
- Boom arm quality significantly affects the experience — budget for a decent one
Bottom line: The setup most podcasting guides arrive at eventually. The PodMic paired with the Scarlett Solo is one of the best-value pairings in podcasting — broadcast-quality voice performance without SM7B money. The right buy for podcasters committed to publishing regularly who want professional-quality audio from the start.

Step-Up Kit — SM7B + Scarlett 2i2
~$500 total — Shure SM7B (~$399) + Focusrite Scarlett 2i2 (~$160) + XLR cable (~$15) + boom arm (~$80) + Sony MDR-7506 headphones (~$100). The setup you build once and stop thinking about.
Kit Components
- Shure SM7B (~$399) — the benchmark podcast microphone
- Focusrite Scarlett 2i2 Gen 4 (~$160) — two input channels, improved preamps, USB-C
- XLR cable (~$15) — standard balanced cable
- Quality boom arm (~$80–$130) — Rode PSA1+ or Heil PL-2T
- Sony MDR-7506 headphones (~$100) — optional but strongly recommended
Pros
- Professional broadcast-quality audio that doesn’t require future upgrades
- SM7B’s tight polar pattern handles untreated rooms better than any mic in this guide
- Scarlett 2i2’s two inputs accommodate in-person two-person episodes without extra hardware
- MDR-7506 headphones are the professional standard — flat, accurate monitoring used in broadcast production worldwide
- Every component has a decades-long track record in professional use
Cons
- $500+ is a real investment — not appropriate for someone still deciding if they’ll publish consistently
- SM7B’s gain requirements may still need a Cloudlifter with some interfaces
- Requires good mic technique to get the most out of the SM7B
Bottom line: For serious podcasters who’ve committed to the medium, want to stop thinking about gear, and are building a setup they’ll use for years. Also the right buy for anyone who records in a notably bad room and needs a mic that compensates. Don’t buy this setup until you’ve published consistently enough to know podcasting is worth the investment.
| Feature | Budget Kit (~$80) | Mid-Range Kit (~$250) | Step-Up Kit (~$500) |
|---|---|---|---|
| Microphone | Samson Q2U | Rode PodMic | Shure SM7B |
| Interface Required | No (USB mode) | Scarlett Solo | Scarlett 2i2 |
| Headphones Included | No | No | Optional (MDR-7506) |
| Boom Arm | Basic (~$15) | Mid-range (~$30–$100) | Quality (~$80–$130) |
| Upgrade Path | Add interface later | Add second mic later | Nothing to upgrade |
| Best For | First-time podcasters | Committed beginners | Serious long-term setup |
What Every Podcast Setup Actually Needs
Strip away the accessories and every complete podcast recording setup has three components: a microphone, a way to connect it to your computer (either USB directly or via an interface), and a way to position it correctly (a boom arm or desk stand). Everything else — pop filters, shock mounts, acoustic panels — improves the result but isn’t required to start. The three kits in this guide are built around those three essentials, with additional components added only when they genuinely improve the outcome.
Why Boom Arms Are Worth It
The single most overlooked component in podcast setups is the boom arm. Every mic in this guide performs better when it’s positioned correctly: directly in front of your mouth, 6–12 inches away, at face height. A desk stand puts the mic below your eyeline and forces you to lean down toward it, which both sounds worse and strains your neck over a long recording session. A boom arm costs $15–$80 and solves the positioning problem permanently. Budget for it in every setup.
Frequently Asked Questions
Do I need headphones to podcast?
Not strictly — but monitoring your recording through headphones is the most reliable way to catch problems before they make it into a published episode. Speaker monitoring during recording introduces bleed: the speaker output gets picked up by the mic. Headphones isolate your monitor signal and let you hear exactly what your mic is capturing in real time. The Sony MDR-7506 is the standard recommendation at around $100, and it’s included in the step-up kit for that reason.
Should I buy a pre-packaged podcast bundle or build my own kit?
Build your own in most cases. Pre-packaged bundles from retailers often include accessories you don’t need — foam windscreens, extra pop filters, unnecessary cables — to hit a price point, while cutting corners on the components that actually matter. The component-based kits in this guide put the budget where it has the most impact: the microphone and the interface.
How much should I spend on my first podcast setup?
As little as possible to get professional-quality audio — which is around $80 for a USB dynamic setup or $250 for an entry-level XLR setup. Don’t spend $500+ until you’ve published consistently enough to know podcasting is worth the investment. The mid-range kit ($250) is the sweet spot: professional results without overcommitting before you’ve established a publishing habit.
Can I upgrade from the budget kit without buying all new gear?
Yes — that’s one of the reasons the Samson Q2U is the budget pick. It has both USB and XLR outputs, so when you’re ready to add a Scarlett Solo or 2i2, the Q2U connects via XLR and benefits from the cleaner preamp signal. You keep the mic you already own and add the interface as a single upgrade purchase. No other component in this price range offers that flexibility.
Related Guides
- Best Complete Podcast Setup Under $200: The Gear Ladder’s Missing Rung
- Best Complete Podcast Setup Under $300: Everything You Need to Start Recording Today
- Complete Podcast Studio Setup for Beginners: Gear, Layout, and First Steps
- Best Podcast Microphone Under $100: Real Picks for Tight Budgets
Browse all guides in our Complete Setups Hub.